

Dry rot repair starts with removing damaged wood and stopping the moisture that caused it. For siding repair for dry rot in Roseville, the work may involve opening the wall beyond the visible damage, treating the exposed area, and rebuilding with sound materials. Patching or replacing siding without addressing the water source can leave conditions for decay in place.
It’s understandable to wonder whether a damaged section can be repaired or whether more of the siding and nearby wood needs attention. The answer depends on how far decay has spread and whether the affected material remains sound enough to repair; swollen, delaminated T-11 panels, for example, need replacement. This article explains how damaged wood is removed and treated, which siding and exterior wood areas may be repaired, and why drainage, flashing, caulking, or other moisture problems should be addressed before new material goes on. You’ll also learn what guides the choice between a contained repair and broader siding replacement, so you can make a clear, informed decision about protecting your home.
Key Takeaways
- Remove decayed wood beyond the visible damage, treat the surrounding area, and replace material that can’t be reliably repaired.
- Check siding, trim, fascia, and openings for concealed moisture damage, even when the painted surface looks intact.
- Correct the water source, such as failed flashing, caulk, drainage, or ventilation, before installing replacement siding.
- Repair water-damaged sheathing and house wrap before new siding goes on; then seal and finish exposed wood to help protect it.
- Use the extent of decay and the condition of surrounding materials to decide whether a contained repair or broader siding replacement makes sense.
Removing affected wood and treating the area
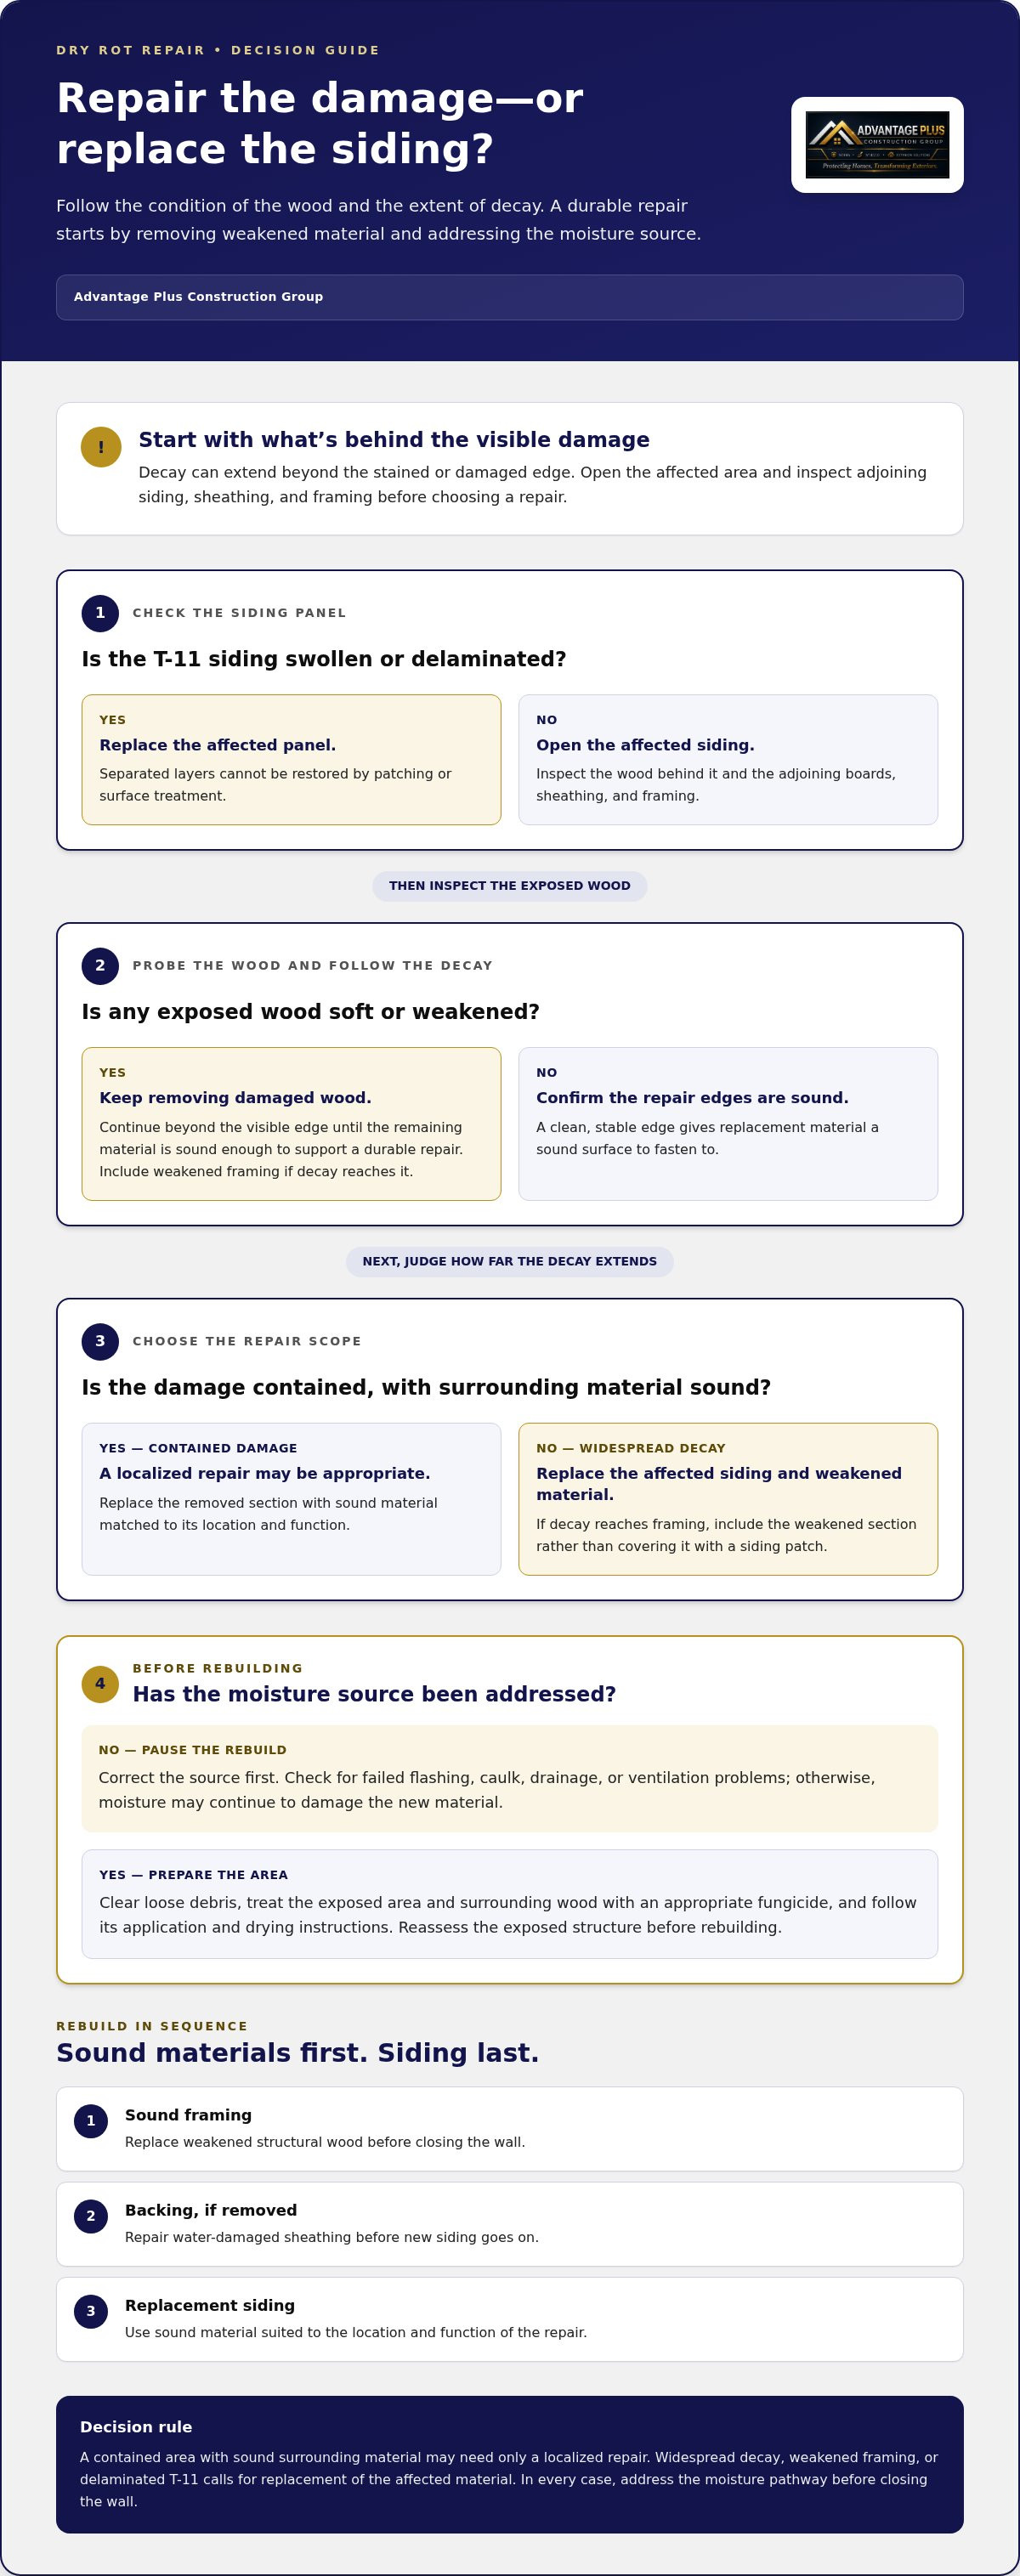
Localized dry rot can often be repaired; widespread decay or delaminated T-11 panels need replacement. Can dry-rotted siding be repaired, or does it need full replacement? A contained section may be repaired, but damaged material must be removed before rebuilding.
Decayed Wood Removal
Open the affected siding and examine the wood behind it. Remove decayed material beyond the visibly damaged edge, since decay may extend into wood that still looks intact. Check adjoining boards, sheathing, and framing as you open the area. If probing reveals soft or weakened wood, continue removal until the remaining material is sound enough to support a durable repair.
Treating the Affected Area
After removing the damaged material, clear loose debris and treat the exposed area and surrounding wood with an appropriate fungicide. Follow the product’s instructions for application and drying. Reassess the exposed structure before rebuilding. Installing replacement wood before the area is ready can trap moisture against the new material.
Wood Replacement Options
Replace removed sections with sound material, including pressure-treated lumber where appropriate. Match the replacement to the location and function: siding closes the exterior, while framing supports the wall assembly. Small, contained damage may need only a localized repair. Swollen, delaminated T-11 plywood panels need replacement because separated layers cannot be restored by patching or surface treatment.
Keep the opening large enough to inspect the edges of the damage. Rot at a siding joint, for example, may extend behind the neighboring board, so stopping at the first visible stain can leave decayed wood in place. A clean edge also gives replacement material a stable surface to fasten to.
Inspect nearby structural wood before closing the wall. If decay reaches framing, the repair must include the weakened section, not just the siding face. Rebuild the assembly in sequence: sound framing first, then any removed backing, followed by replacement siding. Each layer should fit securely without covering soft or deteriorated material.
Carpenter ant or termite damage requires replacing weakened wood rather than covering it with a cosmetic patch. Distinguish insect damage from fungal decay and address the affected wood accordingly. Siding repair for dry rot in Roseville should restore sound material, treat the exposed area, and avoid hiding deterioration beneath a fresh exterior surface.
Why Work With Professionals for Dry Rot Repair?
A durable repair depends on finding the full extent of moisture damage, not just covering the visible mark. For a Roseville home, inspection should connect the damaged siding to the water entry point and any weakened wood behind it.
Contractor Credentials and Warranties
When reviewing a repair proposal, look for a clear scope that explains how concealed areas will be inspected and separates removal, treatment, and rebuilding. Review the written estimate, applicable licensing and insurance documentation, and warranty terms, including coverage, exclusions, and required maintenance. These details clarify what the work involves and who is responsible for each part.
Permit requirements depend on the project scope and local rules. A surface siding repair may differ from work that alters structural components. Determine applicable requirements with the relevant local building department before work begins.
Moisture, Weather, and Rot Signs
Roseville siding can take on moisture where T-11 edges meet ground splash, where window caulk fails, or where overflowing gutters wet the wall. Watch for soft wood, swelling, peeling paint, and boards that warp or separate. Paint can look intact over a suspicious area, so visual appearance alone doesn’t rule out decay.
Compare local repair proposals by asking how each addresses both the damaged siding and the moisture pathway. A warped board, for example, should not be replaced until failed flashing behind it is addressed. Material also affects the repair: vinyl panels need room to expand, while failed caulk joints around James Hardie siding can expose the wood behind it.
Roseville homes may have T-11, vinyl, James Hardie fiber cement, or stucco exteriors. Repair methods vary: replace delaminated T-11, allow proper movement at vinyl panels, and address failed joints behind fiber cement. Stucco damage calls for inspection of the layers behind its finish.
Hidden Damage and Termites
Dry rot may extend beyond the visibly damaged board. Visual inspection can help determine decay in wood components, according to the National Bureau of Standards. Moisture meters, infrared cameras, and borescopes can also help locate concealed trouble behind siding before crews close the wall.
Termite or carpenter ant damage can resemble rot but requires a different diagnosis. Weakened wood should be replaced rather than patched over. Termite treatment may involve liquid termiticides, bait systems, or fumigation for severe infestations. The repair should account for both compromised wood and any affected framing.
When inspection shows damage reaching multiple exterior layers, exterior envelope services can address the siding and the wall assembly as connected parts of the repair.
Siding, trim, fascia, deck, window, and door repairs
Dry rot often starts where exterior wood stays damp, then spreads to connected trim or framing. Around a Roseville home, inspect siding edges, window and door surrounds, fascia beneath gutters, and deck connections as parts of a larger moisture pathway. Damage in one location can point to nearby water entry, so assess adjacent materials before choosing a repair.
At siding, look closely along bottom edges, panel seams, and transitions to trim. T-11 panel edges can absorb water from ground splash, allowing decay to develop where plywood meets the lower wall. Check for swelling, soft spots, separated layers, and paint that bubbles or flakes. A small, contained area may allow a localized repair, while delaminated T-11 panels need replacement.
Window and door openings deserve careful attention because failed caulk can let water reach the wood behind siding. Check the perimeter for cracked or missing sealant, staining, soft trim, and gaps at joints. If a window casing shows decay, inspect the adjoining siding and concealed wood near the opening. Identify how water passed the exterior surface before replacing deteriorated components.
Flashing is central to these repairs. If siding boards have warped, address failed flashing that allowed water behind them before replacing the boards. Otherwise, the new siding may face the same moisture exposure. At a door, examine the trim and nearby wall where the opening meets the siding. At a window, inspect the upper and side joints for entry paths rather than treating damaged caulk as the only concern.
Trim and fascia also need a cause-first assessment. Overflowing gutters, for example, can wet wood beneath the eaves, while damaged fascia may expose adjoining roof-edge wood to moisture. Look for softness, peeling finish, and joints that no longer fit tightly. Correct the water exposure, then replace decayed sections and restore affected connections. Replacement material should meet stable surrounding surfaces, not conceal deterioration.
Decks also have vulnerable contact points. Inspect where deck boards, stairs, or attached framing meet the house, and look for softened wood or persistent dampness. Check nearby siding for splash patterns and staining. Distinguish isolated surface damage from decay that reaches supporting wood. A cosmetic patch will not restore weakened material, and covering wet connections can preserve the conditions that caused the damage.
Finish the assessment by tracing visible damage to its likely source. A failed caulk joint around James Hardie siding can expose the wood behind the boards; ground splash can affect T-11 edges; and gutter overflow can wet fascia. Repair the affected wood and correct the relevant entry path before closing the exterior. This component-by-component approach helps keep window, door, deck, trim, and siding repairs aligned.
Fixing moisture sources before repairing siding
New siding cannot protect a Roseville wall if water still reaches the wood behind it. Trace the moisture path, correct its source, and only then close the exterior with repaired or replacement materials.
Start by inspecting where water can collect or enter. Check drainage beside the wall, gutters and downspouts, ventilation openings, window and door joints, and flashing transitions. A stained siding edge below an overflowing gutter, for example, suggests a different source than soft wood beside a window. Record each damaged area and its nearest likely entry point before removing or installing siding.
Use this sequence to guide the repair:
- Trace the water. Look above and beside the damaged board for failed caulk, open joints, overflowing gutters, or splashback near the ground.
- Correct the pathway. Restore drainage, ventilation, or waterproofing where the inspection identifies a problem.
- Reassess the assembly. Inspect exposed wood and backing after the moisture source is addressed, then plan the siding repair around sound material.
Pay particular attention to flashing around windows, doors, and siding transitions. Correct failed flashing before replacing warped boards, or water may continue reaching the wall behind them. At a window, inspect the upper and side edges, then check adjoining trim for damage. Replacing a visibly affected board without addressing the opening can leave the same route for water in place.
Drainage and ventilation work together. Water that runs toward a wall or splashes against lower siding can keep vulnerable edges damp, while limited airflow can slow drying in enclosed areas. Check whether downspouts direct runoff away from the house and whether vents remain open. If a siding edge sits close to soil or a hard surface, look for recurring splash marks and swelling.
Waterproofing must suit the exterior assembly. Seal joints designed to be sealed, but do not use caulk to conceal failed flashing or damaged backing. A failed caulk joint around James Hardie siding, for example, can let water reach the wood behind the boards. Repair the joint as part of a broader inspection, not as a substitute for checking the layers beneath it.
Roseville is approximately 20 miles northeast of Sacramento, but the key repair decision is the house’s actual exposure. A shaded wall, a window joint, and a lower T-11 edge can each show different signs of moisture. Once drainage, ventilation, and waterproofing are corrected, repair the affected wood and restore the siding. This order helps prevent a new exterior finish from covering an active moisture problem.
Siding, sheathing, framing, fascia, and trim repairs
A lasting exterior repair restores each layer affected by moisture, not just the visible siding. In a Roseville home, the work may involve siding, sheathing, house wrap, framing, fascia, or trim, depending on where water traveled and which materials have weakened.
Once damaged siding is removed, inspect the backing before installing replacement boards. Repair water-damaged sheathing and house wrap before installing new siding. If a lower panel hides deteriorated sheathing, for example, attaching new boards over it leaves the wall’s backing compromised. Use the opening to identify affected material and plan repairs in the right order.
Framing needs a separate assessment because it supports the wall rather than simply covering it. Check exposed studs and adjoining wood for softness, deterioration, or fasteners that no longer hold securely. Replace compromised sections before closing the wall. Where framing remains sound, focus the repair on damaged layers rather than removing unaffected material.
Fascia and trim also need to meet stable surrounding surfaces. At a fascia joint, inspect adjoining trim and the wall edge for signs of water entry. Replace decayed sections, then fit the repaired pieces closely against sound material. The goal is a complete exterior assembly with no deteriorated wood concealed behind a clean finish.
The repair scope depends on how far the damage extends. A small, contained area may be suited to a siding repair. If deterioration appears across multiple sections, or you want to improve durability and appearance, full siding replacement may be appropriate. A localized patch suits an isolated damaged board; widespread damage calls for a closer look at the siding and underlying layers.
For T-11 siding, swollen or delaminated panels need replacement because separated plywood layers cannot be repaired. After repairing T-11, seal and paint it to help protect the material from Roseville weather. These finishing steps follow the structural repair; they don’t substitute for replacing unsound panels or repairing damaged backing.
Use this sequence to keep the work coordinated:
- Remove siding at the affected area and inspect the exposed layers.
- Repair damaged sheathing, house wrap, or framing before covering the wall.
- Install appropriate replacement siding, fascia, or trim against sound material.
- Seal and finish exposed T-11 siding after repair.
If your project calls for a durable siding upgrade after damaged layers are addressed, explore fiber cement siding options for the exterior.
Advantage Plus Construction Group: Fiber Cement Siding
Advantage Plus Construction Group installs premium fiber cement siding for homeowners considering replacement after moisture-damaged wood has been addressed. It is a durable, low-maintenance exterior option when siding is deteriorated or an upgrade is part of the project. Repair decisions still start with sound backing and corrected moisture sources. New siding should not conceal damaged sheathing or framing.
For homes with stucco, Advantage Plus Construction Group also provides expert stucco systems and exterior envelope services. These services support broader exterior projects, while fiber cement siding is an option for homeowners planning a siding upgrade.
Contact Advantage Plus Construction Group to discuss your home's exterior project.
Choose the Next Step for Your Home
A dry rot repair can also be a good time to consider how your exterior should serve your home over time. If the affected siding is part of a wider update, compare a targeted repair with a material change that suits your maintenance priorities and the appearance you want to preserve. The right scope should reflect the home’s condition, not simply the opportunity to replace more material.
For siding repair for dry rot in Roseville, Advantage Plus Construction Group offers premium fiber cement siding, expert stucco systems, and exterior envelope services. These options support projects ranging from a siding upgrade to broader exterior work.
When you’re ready to discuss the exterior work your home needs, contact Advantage Plus Construction Group. A thoughtful next step can help you move from concern about damaged wood toward a durable plan for your home.
Frequently Asked Questions
Is Dry Rot Repair Expensive?
Dry rot repair costs depend on the scope of work. An isolated section may require less removal and rebuilding than decay that reaches sheathing or framing. The amount of siding opened, replacement materials, and moisture-related repairs all affect the project. Before requesting an estimate, note where damage appears and whether the wood feels soft, looks swollen, or has separated layers.
What causes dry rot in siding and how can you identify it?
Dry rot develops when fungal growth and water damage affect wood that stays damp. Check siding edges, joints, and window trim for soft or crumbling wood, swelling, paint deterioration, or separated layers. Look beyond the first visible mark: an intact painted surface can conceal suspicious wood underneath. A careful visual check can identify areas for closer inspection, but the moisture source must also be addressed.
How much does dry rot siding repair cost in Roseville, California?
The price depends on the case and is given after a quote request. In Roseville, the scope is shaped by the affected area, depth of decay, siding type, access, and whether sheathing or framing also needs work. A contained panel repair differs from replacing broader siding runs. Describe the visible damage and note whether the moisture source has been addressed when requesting a project quote.
What factors affect the cost of siding repair for dry rot?
The main factors are how much material is damaged, how deeply decay extends, and which exterior layers need repair. Replacing siding alone differs from work that also involves sheathing, framing, fascia, or trim. Material selection and the amount of surrounding finish affected can also shape the scope. A damaged panel and backing, for example, require more work than replacing an isolated trim section.
How do contractors inspect siding for hidden dry rot and moisture damage?
A visual inspection can reveal signs around joints, windows, lower siding edges, and other places where water may enter. Moisture meters, infrared cameras, or borescopes can help investigate concealed areas. If the surface shows damage, opening a section can reveal the condition of the backing and framing. The inspection should connect hidden decay with a likely moisture pathway.
What steps are involved in repairing dry rot in exterior siding?
A repair generally starts by locating the affected area and opening the siding for inspection. The decayed wood is removed, surrounding areas are treated, and weakened backing or framing is addressed before replacement material is installed. The final work restores the exterior layers and protects exposed wood as appropriate. If the siding is swollen and delaminated T-11, replacement is needed because separated plywood layers can’t be repaired.
How can homeowners prevent dry rot from returning after siding repairs?
Reduce repeat moisture exposure by keeping drainage clear, maintaining ventilation, and restoring waterproofing at vulnerable exterior details. Check gutters, downspouts, window joints, and siding near the ground for recurring water. Homeowners in Roseville, Granite Bay, New Castle, Rocklin, Penryn, Loomis, Citrus Heights, Orangevale, Fair Oaks, Carmichael, and Antelope can use these checks to spot new moisture pathways early and protect repaired wood.


